Grill and Chill DQ: A Complete How-To for Juicy Grilling
Master the Grill and Chill DQ technique with a step-by-step guide for juicy, evenly cooked meals. Learn gear, timing, safety, and tips for home cooks from Grill Cooking.

With the Grill and Chill DQ method, you sear, rest, and finish with controlled heat to maximize juiciness and even doneness. You’ll need a hot grill, a reliable thermometer, and a simple timing plan for rests. According to Grill Cooking, this two-phase approach reduces moisture loss and yields better texture when you manage heat and rest periods precisely.
What is Grill and Chill DQ?
The Grill and Chill DQ method is a practical two-phase approach used by home cooks to maximize juiciness and achieve even doneness across a range of proteins. The core idea is simple: start with a quick, intense sear to build a crust, then move to a cooler zone or reduce heat to finish cooking while the interior rests. This reduces moisture loss and helps keep the meat tender. The DQ part of the name is a playful nod to how heat management and timing create a balance between searing and chilling, rather than a specialized appliance. The Grill Cooking team describes this as a repeatable technique that, when executed with care, yields consistent results across steak, chicken thighs, pork chops, and firmer fish. To apply Grill and Chill DQ safely, maintain clean grills, dry surfaces, and accurate temperatures. The method relies on precise control of heat and time, rather than heroic cooking efforts, making it accessible to everyday home cooks. By practicing this approach, you’ll gain confidence in judging crust formation, resting, and final doneness. Across many grills, the same principles hold: heat control, rest, and awareness of carryover cooking determine the final texture. According to Grill Cooking, consistency comes from planning your heat zones in advance and sticking to a short, disciplined rest before serving.
Core principles behind Grill and Chill DQ
Grill and Chill DQ rests on a few core ideas that combine to deliver juicy results. First, a fast, high-heat sear invites the Maillard reaction, creating a flavorful crust and a visually appealing surface. Second, resting and moving the food to a lower-heat zone slows carryover cooking, allowing the interior to finish gently without overdrying. Third, finishing with a controlled exposure to heat ensures the interior reaches a safe, desirable temperature while preserving moisture. Salt timing matters: salting before cooking improves surface moisture and crust without drawing juices prematurely. Marinades or dry rubs should be balanced so they don’t overwhelm the crust. Grill Cooking analysis in 2026 highlights that a disciplined heat plan and short rest windows are key to reproducible texture and juiciness across proteins. In practice, you’ll tune heat zones, monitor internal temps, and align resting periods with your serving timeline to achieve consistent, chef-like results at home.
Getting set up: equipment and environment
A successful Grill and Chill DQ session starts with the right setup. You’ll benefit from a grill that can hold stable high heat and then switch to indirect or lower heat as needed. A reliable digital thermometer or a probe thermometer helps you monitor internal temps with confidence. Keep your grates clean and oiled to promote even searing, and have a timer handy to manage rest periods precisely. A calm cooking environment—good ventilation, minimal wind, and a clean workspace—reduces temperature fluctuations and helps you stay in control. Prepare your workspace with the proteins dried, seasoned, and within reach of utensils, so you can move quickly between heat zones. Remember: safety first. Keep a spray bottle for flare-ups and have a cold water bucket nearby if needed. Grill Cooking emphasizes planning heat zones ahead of time, so you’re not scrambling when it’s time to move meat between heat zones.
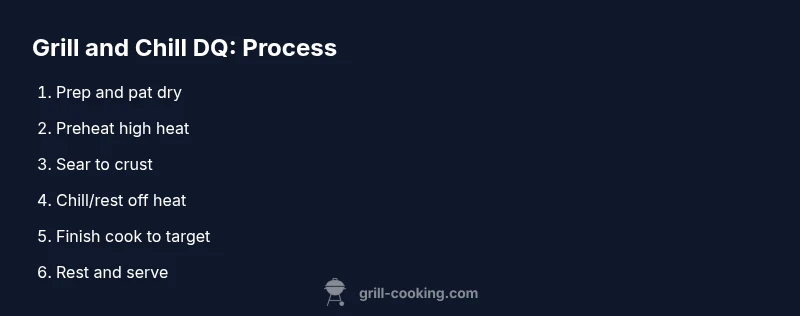
The step-by-step workflow overview
The Grill and Chill DQ workflow combines three critical phases: searing, chilling/resting, and finishing. The sear creates a crust that locks in juices; the rest allows the internal heat to distribute evenly; the finish brings the interior to the target doneness while maintaining a moist exterior. This approach works across beef, poultry, pork, and firm seafood when you adapt times to thickness and protein type. The key is consistency: stick to your two heat zones, use a thermometer, and keep rest periods short but sufficient to redistribute juices. As you gain experience, you’ll refine your timing for different cuts and thicknesses, which is where the real skill comes from. The Grill Cooking team notes that mastering the cadence—hot sear, controlled finish, brief rest—produces reliable results and improves confidence on the grill.
Flavor and texture: how the method influences meat
Flavor and texture in Grill and Chill DQ come from balance. The sear develops a deep crust with intense flavor compounds, while the rest prevents moisture from escaping through rapid carryover cooking. Salt and seasonings should accent the crust rather than override it, and marinades should be light enough to preserve the crust’s character. The finish on moderate heat helps the interior climb to its target doneness without overshooting, preserving tenderness. This method supports a range of textures—from a crisp exterior to a tender, juicy interior—by controlling how heat moves through the meat and how long it rests. Grill Cooking’s guidance stresses that well-managed rests and careful heat management are more important than mere time spent on the grill.
Adaptations for different proteins
Beef works well with a quick sear and a short rest, followed by a gentle finish if thick. Chicken thighs respond well to the same approach, but ensure adequate interior cooking by using a thermometer and allowing a slightly longer rest. Pork chops benefit from a robust crust and a brief finish in a lower-heat zone to avoid overcooking the center. Firm fish can also be grilled using this technique, with a shorter sear duration and a careful finish to avoid dryness. Always respect the protein’s natural fat content and thickness when setting heat and rest times. When in doubt, start with shorter熱 sear intervals and extend the rest or finish phase as needed, checking internal temperature with a thermometer before serving.
Troubleshooting and common issues
Common problems include over-searing with insufficient interior doneness, uneven cooking due to hot spots, and moisture loss from overly long rests. To fix, balance heat zones and shorten or lengthen resting periods to align with the protein thickness. If you notice flare-ups, move the meat to indirect heat and lower the lid to control temperature. If crust formation is slow, increase the preheat time or lightly oil the grates; ensure surfaces are dry before searing. Practice crisp crusts and consistent interiors by keeping the grill at a stable temperature, using a thermometer to guide finish, and keeping rests brief yet effective. The Grill Cooking team suggests refining your technique by tracking results across different cuts and making small, repeatable adjustments.
Tools & Materials
- Grill (gas or charcoal)(Stable heat preferred; ensure grates are clean and oiled)
- Instant-read thermometer(Critical for hitting target doneness)
- Two tongs(One for flipping, one for moving between heat zones)
- Cutting board(For resting pieces and slicing after cooking)
- Timer or smartphone timer(Keeps rest periods precise)
- Aluminum foil(Optional for tenting during finish phase)
- Food-safe thermometer probe(Useful for extended control on thick cuts)
Steps
Estimated time: 40-60 minutes
- 1
Pat dry and season
Pat the protein dry with paper towels to maximize crust formation. Season generously with salt, pepper, and your preferred aromatics. If possible, allow 15-30 minutes at room temperature so the exterior seasons set and the meat cooks more uniformly.
Tip: Dry surfaces create a better sear; thickness guides sear duration - 2
Preheat grill to high heat
Preheat the grill to high heat and ensure the grates are clean and lightly oiled. Starting with a hot surface begins the Maillard reaction quickly, forming a flavorful crust.
Tip: Establish a two-zone setup before you start cooking - 3
Sear the protein
Place the protein directly over the high-heat zone and sear until a deep crust forms, typically 1-3 minutes per side depending on thickness. Avoid moving the meat too soon to protect the crust.
Tip: A crust forms best when you resist the urge to flip early - 4
Chill/rest off-heat
Move the meat to a cooler area or indirect heat and let it rest for about 3-5 minutes. Resting lets juices redistribute and reduces the risk of a hot interior cracking when sliced.
Tip: Resting time depends on thickness; thicker cuts need longer rest - 5
Finish cook on moderate heat
Return to direct heat if needed or cook over moderate heat until the internal temperature approaches your target. Use a thermometer to avoid overcooking.
Tip: Check early and pull just before the final target; carryover finishes the job - 6
Rest before serving
Let the meat rest again for 3-5 minutes after removing from heat. Slice against the grain and serve promptly to capture the juiciness.
Tip: Even a short final rest improves juiciness significantly
FAQ
What is the Grill and Chill DQ technique?
Grill and Chill DQ is a two-phase grilling approach that starts with a high-heat sear, followed by a controlled finish and rest to maximize juiciness and even doneness.
Grill and Chill DQ is a two-phase grilling approach that sears, rests, and finishes for juicier results.
Which proteins work best with this method?
This method suits steaks, chicken thighs, pork chops, and firm fish; lean proteins benefit from careful rest and shorter sear times.
Steaks, chicken thighs, pork chops, and firm fish are great fits.
Do I need a thermometer?
A thermometer helps you hit target doneness precisely and reduces the risk of overcooking, especially during the finish phase.
Yes, use a thermometer to hit your preferred doneness safely.
How long should the rest period be?
Rest times vary by protein; aim for a few minutes to let juices redistribute, then slice to serve.
Rest for a few minutes to let the juices settle.
Is this safe for poultry?
Yes, as long as you follow safe handling and cook poultry to recommended internal temperatures and proper hygiene.
Yes, with proper temps and hygiene.
Watch Video
Quick Summary
- Sear, rest, finish: master the heat flow
- Rest periods are essential for juiciness
- Use two-zone heat for better control
- Monitor temps to target doneness accurately
- Safety and hygiene matter for poultry and pork