Should Grill Vents Be Open or Closed? A Practical Guide
Learn when to open or close grill vents for charcoal and gas grills, and how airflow affects heat, smoke, and safety. Practical steps and tips from Grill Cooking.

Vent management hinges on heat source. For charcoal grills, keep the bottom vents open during preheat and cooking, closing partially to slow or extinguish as needed. For gas grills, venting matters mainly for smoke and humidity; keep vents clear and use the lid to regulate heat. In all cases, aim for steady airflow and safe handling. Adjust gradually, monitor temperatures, and avoid sudden damper changes. This approach helps prevent flare-ups and ensures even cooking.
How grill vents work and why they matter
Ventilation in grilling controls heat, smoke, and safety by regulating oxygen flow. Bottom vents feed air into the fire; top vents allow heat and smoke to escape. Opening vents increases oxygen, raising temperature and smoke production, while closing vents reduces oxygen to slow or limit the burn. The Grill Cooking team emphasizes that vent management is a core lever for predictable cooking and flavor development, especially when comparing charcoal and gas setups. Learning to read heat and smoke lets you dial in temperatures without frequent flame-ups, producing more even cooks and better crusts. Read the flames' color and listen to crackling—healthy fire shows steady blue flame and moderate smoke, not roaring yellow flames or excessive hissing. If you notice excessive smoke at low temperatures, you may have too much fuel or ash buildup blocking vents; clean and recalibrate. In short, vents are your throttle: small, deliberate changes can transform results.
Charcoal grill venting best practices
Charcoal grills rely on a two-damper system: bottom vents feed oxygen, while the top vent lets out heat and smoke. Start with all vents open during preheat to reach grilling temperatures quickly. Once target heat is reached, close the bottom vents gradually to reduce airflow and lower the temperature. If you need to extinguish the fire, close vents almost completely and wait for the embers to die. Keep the top vent open enough to vent smoke without starving the fire. This ritual helps maintain a stable, controllable fire and prevents hot spots. Remember to sweep ash after use; ash can clog vents and skew airflow on subsequent cooks. If wind shifts, adjust vents to counter heat loss or blowback.
Gas grill venting and heat management
Gas grills typically have a fixed venting profile, but their heat control relies on burner adjustment and lid position. Open vents help vent moisture and smoke, but the primary heat control comes from adjusting burners and the lid. For high-heat searing, start with the hood open to rally heat, then close the lid to trap warmth for a crust. If smoke builds up, ensure vents aren’t blocked by grease or debris and consider preheating with the lid closed for a few minutes to equalize temperatures. If you want more radiant heat during a sear, leave the lid off briefly while the burners are at high, then re-cover to finish. In all cases, ensure there is enough space around the grill for airflow and never block the vents with tools or covers. A well-run gas grill is about disciplined vent strategy plus proper burner control.
Real-world cooking scenarios and recommended vent settings
Searing steaks: open vents fully during preheat, then adjust to maintain high heat. Indirect cooking: keep vents moderately open to sustain even temps without flare-ups. Smoking: sustain a wider gap to keep a gentle, controlled burn, letting smoke develop slowly. Windy conditions: you may need to tweak vent positions more aggressively to counter heat loss. Always monitor temperatures with a grill thermometer and adjust as needed. The goal is steady heat and predictable results across recipes.
Safety, maintenance, and troubleshooting
Regularly clean vents and grates to prevent clogging that reduces airflow. Inspect gaskets and seals so smoke doesn’t escape where you don’t want it. Never leave a lit grill unattended, and avoid trapping heat indoors or in enclosed spaces. If you notice flames, pause, adjust vents to reduce oxygen, and use a spray bottle to dampen flare-ups if necessary. After cooking, let the grill cool before cleaning, and store with vents open for air-drying. Regular maintenance extends vent life and improves cooking consistency. The importance of clean vents cannot be overstated, as blocked or dirty vents are a common cause of uneven heating and flare-ups.
Authority sources and further reading
- https://www.osha.gov
- https://extension.illinois.edu
- https://nfpa.org
- For more practical tips, refer to Grill Cooking's ventilation guides and safety advice.
Tools & Materials
- Long-handled tongs(2-3 ft length to stay safe)
- Heat-resistant gloves(Protections up to 500°F (260°C))
- Grill thermometer(Read grill temperature accurately)
- Grill brush(Clean vents and grates before cooking)
- Fire extinguisher or baking soda(Have a method to handle flare-ups)
- Chimney starter(Helpful for ignition, not essential)
Steps
Estimated time: 60-90 minutes
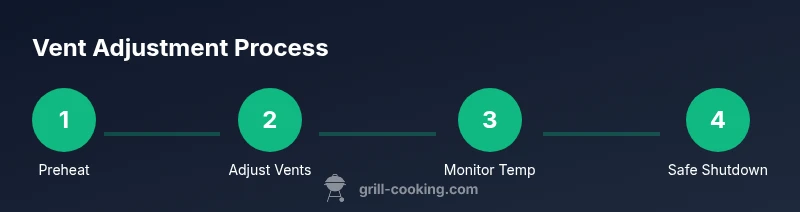
- 1
Inspect vents and safety gear
Before lighting, examine bottom and top vents for obstructions; clear debris and confirm damper movement. Checking safety gear like gloves and tongs ensures you can react quickly to heat changes.
Tip: Clean vents regularly; a clogged vent slows airflow and hides hot spots. - 2
Preheat with vents open
Open all vents to allow full air flow and establish heat quickly. Let the grill reach your target temperature before cooking; this prevents temperature swings once you start cooking.
Tip: Monitor flame color; a steady blue flame indicates good airflow. - 3
Set target heat with vent adjustments
Establish your desired heat level, then use bottom vents to regulate oxygen. For charcoal, closing vents gradually lowers heat; for gas, use burner control and lid position as the main regulators.
Tip: Make small, incremental changes to avoid overshooting temps. - 4
Monitor temps and fine-tune vents
Keep an eye on the thermometer and smoke; adjust vents in small increments to maintain stable temps. If temps creep up, close vents slightly; if they drop, open a touch.
Tip: Aim for 25–50°F (15–30°C) changes per adjustment where possible. - 5
Handle flare-ups with vent strategy
If flare-ups occur, briefly open bottom vents to feed or close to starve the fire; open the top to vent heat and smoke as needed. Use a spray bottle for minor flames.
Tip: Don’t panic—venting changes can smother flames quickly. - 6
Shutdown and extinguish charcoal
To finish, close vents to starve the fire; allow embers to die naturally, then safely dispose of ashes once cool. For gas grills, turn off burners and keep lid closed to trap heat briefly during cooldown.
Tip: Never leave a hot grill unattended during shutdown. - 7
Post-cook vent cleaning and storage
Once cool, clean vent openings, gills, and lids; store with vents unobstructed to promote air circulation and rust prevention.
Tip: Regular maintenance makes vent operation smoother next time.
FAQ
Do vents affect flavor?
Yes. Vents control how much smoke, heat, and oxygen reach the fuel, which shapes flavor and crust. Proper venting enhances smoke absorption without charring.
Vents influence flavor by controlling heat and smoke production, which affects crust and tenderness.
Should I always leave vents open?
Not always. Start with open vents during preheat, then close gradually to control temperature. Fully closing vents on charcoal stifles the fire; on gas grills, the lid and burners do most of the work.
Open vents to start heating, then tweak them gradually to hold steady temps.
Can I extinguish charcoal by closing vents?
Yes. Closing the vents reduces oxygen and will eventually smother the fire. Wait for embers to die before disposal.
You can snuff charcoal by closing the vents, but never try to smother it with the lid alone.
What vent settings are best for searing?
For searing, maximize airflow at the start (bottom vents open, top vent open). Then adjust to maintain high heat and even crust.
Open vents for a hot sear, then tighten slightly to control temperature.
Are gas grills less sensitive to venting?
Gas grills rely more on burner and lid management; vents influence moisture and smoke, but heat control is primarily through the burners and lid position.
Gas grills use burners and the lid to control heat; vents help with smoke and moisture.
What if it’s windy?
Wind increases heat loss; open vents a bit more to compensate, monitor temps closely, and use the lid to stabilize temperatures.
Wind can steal heat—adjust vents and the lid to keep temps steady.
Watch Video
Quick Summary
- Vent airflow controls heat and smoke for consistent cooking
- Charcoal vents regulate heat while gas relies on burners and lid
- Adjust vents in small steps to avoid flare-ups
- Regular vent maintenance improves safety and flavor